Introduction
(if you are not interested in the how’s and why’s, you can just jump to the recipe.)
My parents are from out west and so I grew up eating home-cooked Mexican food. Now with a family of my own, we often do the same — with some differences of course. I’m much more likely to do some research and try to create more authentic dishes than my parents and of course now there is a general focus on fresh, quality ingredients. Back in the ’70s? Not so much.
Surprisingly though, “authentic” had very little to do with me creating my own chili powder. My first discovery on researching this was that chili powder, like so many “Mexican” dishes in the U.S. has nothing to do with Mexican cuisine. While there are various accounts about who invented it, and I think the best claim for inventing what most of us use goes to one Willie Gebhardt. If you read through that article, you’ll see that chili powder was basically the invention of an German immigrant to America looking for a way to preserve chilies.
First, chili was only a seasonal food during the late 1800s as fresh chilies were not available during the fall and winter months. Moreover, no known method for keeping chilies fresh existed at the time. Although dried chilies were known, they were mostly reconstituted with hot water and then diced and served in the chili. However, their texture was tough and they lost much of their flavor. Fresh chilies were preferred. Willie discovered that if he dried his chili peppers and ground them into a flavoring powder, he could keep the concoction fresh for months at a time.
And so chili powder was born. The current commercial process used to create it is, from what I’ve been able to discover, basically the same – the dried chilies and spices are soaked in a combination of water and alcohol, the liquid is expelled/drained and the cakes of spice mixture are then dried at around 125° F. Now, I’ve made a bit of an amateur study of herbs and the preservation of them (drying, extracts, etc.) and I know that if you’re trying to preserve as much of the original flavor as possible, you don’t soak plant-based materials in liquid, remove the liquid, and then subject it to more heat. What’s left over has as much in common with unprocessed dried chilies as an old tea bag has with unused loose tea. So I set about to see if I could make something better.
It should be noted that, according to some websites, the U.S. government has standards for the labeling of what can be sold as chili powder. Unfortunately, with the many reports of lead and salmonella contamination of commercial chili powders, I don’t think that makes me feel any safer. One of my goals in this was to use as many whole, unprocessed ingredients as possible, as that’s honestly the best way to avoid many contamination issues. Can spices, even whole ones, still contain bad stuff? You bet. But I try to buy from trustworthy sources and I know nothing I do in the processing of these ingredients is going to introduce something I don’t want.
In addition to the above reasons, there were a few other factors that served as inspiration for this recipe.
- I wanted a lot of flavor and not crazy amounts of heat. This was both to make this as general purpose as possible and to meet the needs of several “baby-mouths” in my family. If you want more heat, you can either use different peppers or just add however much cayenne powder you wish. But the focus of this is really to create layers of flavor.
- I’m not a huge fan of Indian cuisine, but I love the culture that’s built up around it – particularly the masala. These spice mixtures, while sold here in the U.S. in bland plastic containers with words like “Authentic!” printed on it, are in India all different based on geography and family. The preparation and ingredients are matters of familial, ethnic, and regional identity and in chili powder, I saw the opportunity to create essentially the North American version of that. So experiment with what I have outlined below and make it your own.
- In that same spirit, I’ve outlined a “base” recipe and then highlight some additional ingredients and preparation steps that you can look at – either to do yourself, or perhaps give you ideas of your own.
JB’s Chili Powder
Ingredients
Where possible, I’ve linked to my usual sources for ingredients, but please feel free to buy from wherever you want. Also, be aware that when I make this, it’s usually a batch four times as big, so some of my sources are geared to much larger amounts than called for in this recipe.
Do me this favor: do not buy spices from the supermarket. Even with whole spices, sitting forever on shelves under bright fluorescents in clear bottles is not a good thing. If you have access to a Latin market, try there as there will be enough turnover to help ensure some sort of freshness — otherwise, the Internet is your friend.
Chilies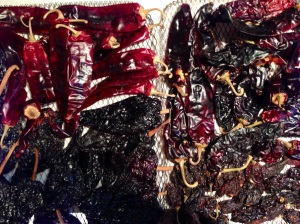

- 4 oz dried guajillo chilies
- 4 oz dried ancho pasilla chilies
- 2 oz dried New Mexico chilies
- 1 oz dried chipotle chilies
Lightly roast the chiles over lowish heat, being careful not to burn them. The ancho in particular may require a little bit longer. You’re trying to bake as much of the moisture out of them as possible (yes, dried chilies can and do still have moisture in them). What I often do is after grilling dinner, when the coals have burned down a bit, I’ll stick the chilies in — making sure that they are only receiving indirect heat. If you have some wood chips or there was already wood chunks on the coals, all the better in my opinion. Of course, if you hate fire and fun, all of this can be done in an oven too (but not the microwave for goodness’ sake!).
How you do you know when they’re done? Well, this is one of the other ways my recipe goes off the beaten path. Google “DIY chili powder” and almost all of them will tell you to remove the stem and seeds before you roast them. I, of course, laugh at convention – and with good reason. By keeping the stem and seeds, you have essentially a deflated balloon. When the pepper is placed on the heat, the air and water that is left inside starts expanding and re-inflating the pepper. You can see exactly what I mean in this video:
Ideally, slow roast the peppers (with smoke added if you wish) at about 250° F for about 5 minutes and then find a little bit of direct heat right over the coals (or in a skillet on high if doing this the not-fun, no-fire way) and keep turning them until they start to inflate and remove them before there’s any burning. Seriously – these are for the most part mild peppers, but you do not want to breath in smoke from burning chilies. BAD IDEA.
When done, the chilies will have softened to an almost leather-like consistency. Remove from heat and layout in a thin layer on a cookie sheet or cooling rack to cool down. As soon as they are safe to touch, remove the stem and split open to remove seeds BUT FIRST, get some gloves.
Remember, you’re not just touching peppers as you would when cutting fresh ones, you’re digging around, pulling off stems and removing seeds. Even with relatively mild peppers like these, your day will go very quickly south if you touch anywhere on your body with hands covered in chili oil. You’ve been warned! Oh, and if using the chipotle peppers, get to them as soon as you can. As they have already been roasted and smoked, when they cool off, they’ll basically be as hard as rocks. At the very least, get them de-stemmed and split in half as soon as you can – the seeds can come out after they’ve cooled more if necessary.
If you want more heat in the final chili powder, I suggest going with hotter peppers but still taking the seeds out – yes that is where the heat is, but ground up in a powder (if you can get them ground up at all) it adds an unpleasant bitterness.
For now, hold off on grinding the peppers — we’re going to get a little help with that first. But do check to see if there are any that aren’t quite crisp all the way around yet and finish them off in a toaster oven or on the stove top. We need them as crispy as possible without actually being burnt.
Spice mix and preparation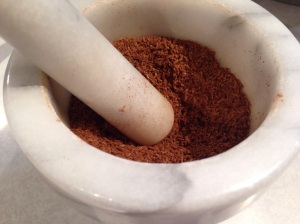

As the peppers are completed, put them aside and then assemble the following:
(and yes – these are, unless otherwise specified, all by weight, not by volume – trust me, this works much better)
- 50g coarse sea salt (I use my own smoked sea salt – recipe at the end of this one)
- 37.5g garlic powder (not garlic salt, garlic powder!)
- 11g ground mixed peppercorns (all black will do, but the mixed variety help builds up those layers of flavor)
- 16.5g onion powder (I used this toasted onion powder)
- 11g seasoned salt
- 5g dried Mexican oregano (very fine powder)
- 19g whole cumin seeds
Possible additions (I actually use all of these)
- 12.5g smoked paprika
- 50g tomato powder
- 16g cacao nibs (or cocoa powder if you like)
- 6 packets dehydrated lime juice (True Lime – this stuff is magic and also great on popcorn – just FYI)
- 2.5g instant espresso coffee
- 5g celery seed powder
- 10g fine cut celery flakes
Before the next step, I advise toasting the cumin seeds and then, along with the sea salt and the cacao nibs, run them through the food processor, a separate small spice grinder, or a mortar and pestle (if you have one …which you totally should). Otherwise they may be a little too chunky to break down.
Bringing it all together
Now, some people use dedicated spice grinders for this and ol’ Willie Gebhardt used a coffee grinder for his, but I prefer the food processor. Most spice grinders are too small for this type of application and electric coffee grinders (yes, even the nice burr ones) tend to overheat oil-rich items (especially sticky, soft, dried peppers), imparting a scorched taste to the finished product. The food processor with its big chopping blade and ample space will work much better.
So go ahead and put your de-stemmed and de-seeded peppers in the food processor, and start pulsing the blade. After a few pulses, add about half the spice mixture above and pulse on and off for about 30 seconds. Now add the rest of the spice mixture and continue pulsing for another 30 to 60 seconds until the mixture is as fine a powder as it will get and well mixed. The idea is that the spices themselves will help break down the chilies.
Now you can go ahead and stop there if you wish, but if you want to help make sure the powder is as fine as possible, what I do is put it, in small batches, through a strainer-sifter. Take whatever is left that didn’t go through the sifter and run it through the food processor again (or a smaller spice grinder or a mortar and pestle if you have one …which you totally should). You’ll likely always end up with a few larger flakes rather than a perfectly uniform powder, but that’s not necessarily a bad thing. The main thing is to make sure all the seeds have been removed, as well as possible, at each step.
Storage
So we’ve completed this Herculean task of making our own chili powder! Yay! Go us! Now put it in your cupboard and be happy! Wait…
Your cupboard/spice cabinet is in your kitchen, right? Probably not too far away from your stove top, microwave, oven, etc. And there’s probably quite a bit of light in there, huh? For most spices bought from a mega-mart, that’s probably not going to do any more harm to them then has already been done. But this chili powder – it deserves better.
Here’s what we don’t want: light, heat, and air. So we need something preferably opaque, in a stable, cool environment and an air-tight container. Let’s take a page from how you should be treating your coffee: put it in the freezer. In an airtight container in the freezer, this stuff will keep at almost peak freshness for …well, a lot longer than the six months or so that Mr. Gebhardt managed, that’s for sure. And please make sure the container truly is air tight, and the container is non-reactive (so no plastics!). If you take care of it, it will take care of you.
Smoked Sea Salt
 It hardly seems fit to call this a recipe. It’s just too easy. But since I continue to get questions about it, here you go:
On a large steel cooking sheet or aluminum pan, spread about 2 lbs of coarse sea salt. In your grill or smoker (again, this works really well if you start it after a normal grilling session), add in some wood (presoaked for at least 4 hours in water). I’ve used oak, hickory, maple, apple, cherry, pecan, and mesquite — and various combinations thereof. Put the cookie sheet with the salt on the grill, close the grill and go do something else for 20 minutes. Come back and with a metal or silicone spatula, stir the salt around. If you need to add more wood, do that too. Now go do something else for about 20 to 30 minutes. Or an hour. It doesn’t really matter at this point. It’s not like you can burn the salt after all! Basically, get it as smokey as you want and bam! You’re done!
So what to do with it after that? Well, you can use it in a chili powder recipe obviously. And it makes a great fancy finishing salt. On top of a quality dark chocolate, it’s pretty much divine, or a couple of grains added to a dish of ice cream with a chocolate or butterscotch sauce will rock your socks off. Basically, whatever you want. My family likes it so much, we bought one of these and put it, fresh ground, on pretty much everything — but especially on popcorn with a little of that True Lime I mentioned above. Best. Popcorn. Ever.
